CONFIRM THE PART FITS
Part Information
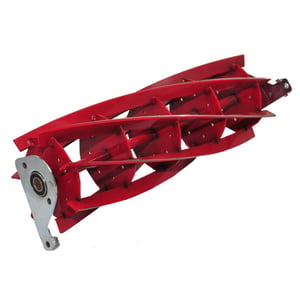
This blade assembly (part number 1107-7) is for reel lawn mowers.
Blade assembly 1107-7 spins to cut the grass. The assembly may include multiple parts; refer to your parts diagram for a complete list of parts included.
Wear work gloves to protect your hands when installing this part.
Top models using the same part
| Model Name | Model Number | Diagram Name |
|---|---|---|
| Model #328915700 Craftsman walk-behind mower | 328915700 | Replacement parts |
| Model #328395200 Craftsman walk-behind mower | 328395200 | Front throw reel mower |
| Model #328395900 Craftsman walk-behind mower | 328395900 | Front throw reel mower |
| Model #328815530 Craftsman walk-behind mower | 328815530 | All parts |
| Model #328375203 Craftsman walk-behind mower | 328375203 | Front throw reel mower |
| Model #328815520 Craftsman walk-behind mower | 328815520 | All parts |
| Model #328375302 Craftsman walk-behind mower | 328375302 | Replacement parts |
| Model #328815340 Craftsman walk-behind mower | 328815340 | All parts |
| Model #328375202 Craftsman walk-behind mower | 328375202 | Replacement parts |
| Model #328815510 Craftsman walk-behind mower | 328815510 | All parts |
Reviews
Easy installation, tough to adjust blade.
Installation was pretty simple. Remove height adjustment wheels in the front, remove bed knife (3 bolts on each side), the chain guard, the side cover (don't need to remove bolts for the wheel), reel drive sprocket (allen wrench), and the reel (3 bolts on each side). Caution: The new parts are very sharp and need to be handled carefully. Reassembly: Be sure to start the bolts on the drive side first for the bed knife and reel, but leave loose. Then put on the side cover and start the bolts and leave loose, also. Hand tighten the bed knife bolts on both sides to seat the special washers. Then tighten the rest of the bolts (except the bolts for the reel) on the side cover. Proceed to tighten the all the bolts on the bed knife. The next part will need some patience, precision and a little luck. Be very careful when doing this part and never forget that the blade is very sharp. Move the reel away from the bed knife until it does not touch. This is where the patience comes in. Start moving the the reel until it just barely touches one side of the bed knife, then lightly snug the adjustment bolts. Do the same for the opposite side making sure the reel is turned enough to make contact on the end of the bed knife. If the blade doesn't turn, loosen the first side and move the reel back just until it touches the bed knife. Keep repeating the process until the reel has full contact with the bed knife. Test blade by inserting a one-inch wide piece of paper between the blades and slowly turn the reel. A good setting is when the reel can cut the paper on each end and the middle with a slight drag. DO NOT GET FINGERS BETWEEN THE BLADES, IT IS LIKE A VERY SHARP SCISSORS. When adjustment is good, tighten the reel bolts and re-check with the paper test. The reel may move when it is tightened, but be sure to readjust if it does or it may not have the desired result. After the final tightening and testing is satisfactory, then reinstall the sprocket making sure the setscrew if facing up so you have enough clearance for the allen wrench. Reinstall the chain guard and the height adjustment wheels.
DYIerHI, Hawaii
Did you find this review helpful?
- Ease of Installation
- Difficult
- Duration of Installation
- 1 - 2 hours
