CONFIRM THE PART FITS
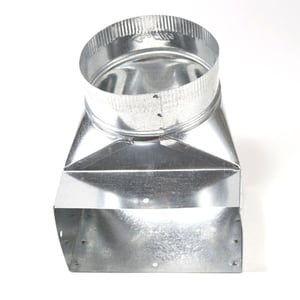
Cooktop Downdraft Vent Elbow Transition 5304488297
Part #5304488297
Part Information
This downdraft vent elbow transition (part number 5304488297) is for cooktops.
Downdraft vent elbow transition 5304488297 connects the blower to the duct work in areas where space for duct work is limited.
Follow the instructions in your owner's manual or installation guide when installing this part.
Frequently Used Together
- $31.81 |16% OFF Phone Price : $37.81
- $7.39 |12% OFF Phone Price : $8.39
- $38.84 |13% OFF Phone Price : $44.84
- $7.39 |12% OFF Phone Price : $8.39
Top models using the same part
| Model Name | Model Number | Diagram Name |
|---|---|---|
| Model #79031113510 Kenmore Elite gas cooktop | 79031113510 | Main top |
| Model #79031113211 Kenmore Elite gas cooktop | 79031113211 | Main top |
| Model #79031123510 Kenmore Elite gas cooktop | 79031123510 | Main top |
| Model #RC36DG60PS0 Universal/Multiflex (Frigidaire) gas cooktop | RC36DG60PS0 | Cook top |
| Model #79031123211 Kenmore Elite gas cooktop | 79031123211 | Cook top |
| Model #RC30DG60PS0 Universal/Multiflex (Frigidaire) gas cooktop | RC30DG60PS0 | Cook top |
Reviews
Required tin snips to get it to fit
When the previous homeowners installed a Kenmore gas cooktop as part of a kitchen remodel, an offset was required to connect the vent to the duct going out the bottom of the cabinet. They just taped a flexible round duct to the cooktop's rectangular vent outlet. A lot of air blew out around it, the duct was kind of in the way of cookware storage in the cabinet, and it didn't look great. I scoured hardware stores for something better, but the vent outlet seems to be a non-standard size. I found this elbow transition which seemed to be just what we needed, albeit quite expensive. Unfortunately, the rectangular end was almost exactly the same size as the vent outlet from the cooktop, so it wouldn't fit inside or outside. I tried flaring it out a bit with pliers, but I couldn't get the two parts to overlap more than about 1/8". They need close to an inch overap for the screw holes to line up. Eventually I resorted to using tin snips to slice about 1.5" down one corner and then taped it up really good after getting the parts screwed together. Ultimately it met my needs but I was disappointed I had to damage the part just to get it to fit, especially after spending so much on what was supposed to be the correct part for this purpose.
NathanP, Undisclosed
Did you find this review helpful?
- Ease of Installation
- Difficult
- Duration of Installation
- 30 minutes - 1 hour
