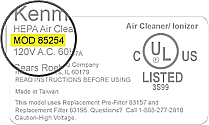
Tips to find your model number
Model numbers typically look like this:


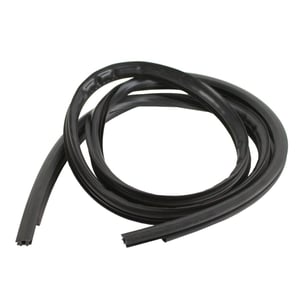
This door seal (part number WP99003337) is for dishwashers.
Door seal WP99003337 seals the gap between the opening to the dishwasher tub and the outer edge of the door.
After installing the door seal, shut the dishwasher door and leave the door closed for several hours to properly seat the new door seal.
| Model Name | Model Number | Diagram Name |
|---|---|---|
| Model #RJDW2480B Jade dishwasher | RJDW2480B | Tub |
| Model #JDB1105AWB10 Jenn-Air dishwasher | JDB1105AWB10 | Tub and frame parts |
| Model #JDB1095AWS42 Jenn-Air dishwasher | JDB1095AWS42 | Tub and frame parts |
| Model #JDB1095AWW0 Jenn-Air dishwasher | JDB1095AWW0 | Tub and frame parts |
| Model #JDB1095AWB1 Jenn-Air dishwasher | JDB1095AWB1 | Tub and frame parts |
| Model #JDB1255AWB44 Jenn-Air dishwasher | JDB1255AWB44 | Tub and frame parts |
| Model #JDB1095AWB44 Jenn-Air dishwasher | JDB1095AWB44 | Tub and frame parts |
| Model #JDB1255AWB10 Jenn-Air dishwasher | JDB1255AWB10 | Tub and frame parts |
| Model #JDB1080AWW0 Jenn-Air dishwasher | JDB1080AWW0 | Tub and frame parts |
| Model #JDB1255AWW1 Jenn-Air dishwasher | JDB1255AWW1 | Tub and frame parts |
Watch the installation video, it explains everything you need to know to install the Door Seal.
Mrs. G, Edmonds, WA
Did you find this review helpful?
Exact part replacement. I pulled the old gasket out and put the new one in - easy job.
wsff, Boston
Did you find this review helpful?
Original seal was in bad shape, it was just a matter of time that it would start to leak. Before removing the seal, I took photos with my camera of the area by the hinge or at the bottom of the door. So that I would make sure I placed the new seal in the same location. As I removed the seal slowly, I stopped and looked at the way the seal was placed in the groove it was seating in. I matched it to the new seal and made a couple of small "x" 's on the part of the seal facing the front.(I used a silver sharpie) So that I would make sure I did not place the seal wrong. The area the seal was seated in, or the groove had a lot of buildup of gunk. In a 3 gallon bucket I poured about 1/2 cup of vinegar in a gallon of water. A soaked a rag rag in this solution, wrung the rag and cleaned the groove the seal was in and cleaned the gunk buildup at the bottom of the door and in the the groove the seal was seated in. I was pleased at the results. This is what I used, you are welcome to use what works best for you. I placed the new seal in the groove making sure the "x" 's were facing the front. Seal was centered, closed the door, felt tighter than the old seal did. Good as new.
Little J, Fountain, CO
Did you find this review helpful?