- Kenmore refrigerator water filters
- Whirlpool refrigerator water filters
- Samsung refrigerator water filters
- GE refrigerator water filters
- LG refrigerator water filters
- Frigidaire refrigerator water filters
- KitchenAid refrigerator water filters
- Maytag refrigerator water filters
- Kenmore Elite refrigerator water filters
- Estate refrigerator water filters
- GE Profile refrigerator water filters
- Amana refrigerator water filters
- Bosch refrigerator water filters
- Dacor refrigerator water filters
- Electrolux refrigerator water filters
Can’t find your part? Contact us: +1-309-603-4777
Top DIY repair help
View All Repair Categories
Appliances
Lawn & Garden
Power Tools
Home Improvement
Sports & Leisure
Heating & Cooling
OrdersSchedule a repair
Keep track of the models you own in your profile
Sign in or Register to view or add models
F90 error code troubleshooting for ranges video


This video from Sears PartsDirect shows what to check when your range flashes an F90 error code. This code can appear when you try to lock or unlock the oven door, or when you try to run a self-cleaning cycle. The F90 code means the electronic oven control board detects a problem with the door lock system. Watch this troubleshooting video to learn how to examine the components in the door lock system—including the control board, wiring and oven door lock motor assembly—and find out which part has failed.
The video covers Kenmore and Frigidaire ranges with the oven door locked and F90 appearing in the display. The F90 code also appears on these types of ranges when the control attempts to lock the oven door but the door won't lock.
For more DIY help with your electric or gas range, check out our repair help page for troubleshooting tips and videos, repair guides and error code charts.
Hi. Wayne here from Sears PartsDirect. Today we’re going to talk about what to do when you see the F90 error code on your range.
You’ll see this code when you try to lock or unlock the oven door on a Kenmore or Frigidaire range with an oven lock feature like this one.
The F90 code means the electronic oven control board detects a problem with the door lock system.
The F90 code can appear when you try to start a self-clean cycle, which uses the door lock. You might also see the F90 code when the self-clean cycle ends and the electronic control can’t unlock the oven door.
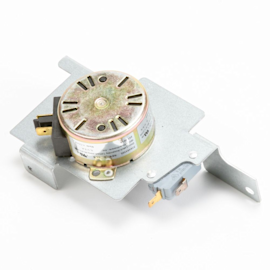
In this troubleshooting video, you’ll examine the components in the door lock system to find out which part failed. Components in the oven door lock system include the electronic control board, the wiring and the oven door lock motor assembly. The oven door lock assembly includes the door lock motor and the door lock switch.
Tools you may need
Let's get started. You need a nut driver to remove the range back panels and a multimeter to perform electrical checks during this troubleshooting. You may also need a Phillips screwdriver to disassemble parts for testing.
First, unplug the range and pull it out of the cabinet. If you have a gas range, shut off the gas supply. Remove the screws and pull off the top and bottom back panels.
Check the wires
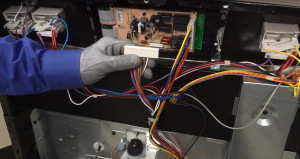
Check the wiring connections between the control board and the oven door lock assembly. Reconnect any loose wires and repair any broken or damaged wires.
This simple step may fix the door lock problem and clear the F90 code.
If you find and fix a broken or disconnected wire, reassemble the range and restore power to it. You’ll hear the door lock motor run when you plug it in, because the control finishes locking or unlocking the door—whichever action it started when the F90 error code occurred.
Check the door lock switch
If the wiring connections between the control and the door lock assembly appear to be okay, check the door lock switch next.
The door lock switch rests against the door lock cam and detects door lock motor movement.
If the door lock switch breaks and can’t detect cam movement, the range displays the F90 code. To see if the switch or wiring is broken, check resistance through the door lock switch and its wiring.
Disconnect the wire harness plug with orange and gray wires from the electronic oven control board—it’s the orange and gray wires connect to the door lock switch.
We'll check the switch and its wiring with the switch arm in two positions: pushed in and extended. If the switch and wiring are both okay, the meter should measure near 0 ohms of resistance with the switch arm pushed in and OL with the switch arm extended.
But if the multimeter measures the same resistance in both tests, the switch or the wiring is broken and the F90 code appeared because the control can’t detect lock motor movement.
With your multimeter set to measure ohms, touch one meter probe to the orange wire and the other meter probe to the gray wire on the wire harness plug.
Now, reverse the position of the switch arm. If the switch arm was extended for the first reading, use a screwdriver to press in the switch arm during the second test. If the switch arm was pushed in for the first test, remove the cam screw and pull off the cam to release the switch arm for the second test.
Once you’ve reversed the positon, with your multimeter set to measure ohms, touch one meter probe to the orange wire and the other meter probe to the gray wire on the wire harness plug.
If the multimeter measures near 0 ohms with the arm pushed in and OL with the arm extended, the switch and its wiring okay. You can skip to the next section of this video to check the door lock motor—just look for the title slide that says Door Lock Motor Testing.
If the multimeter measures the same resistance regardless of arm position, it means that either the switch is broken or the wiring failed. To determine whether the switch or wiring is at fault, disconnect the wires from the switch spades. Repeat the resistance test with the arm pushed in and then with it extended, by touching the meter probes directly to the switch spades.
If the multimeter measures the same resistance through the switch spades regardless of arm position, replace the switch.
But if the meter measures near 0 ohms with the arm pushed in and OL with the arm extended, replace the wiring because you know the switch is okay.
Door lock motor testing
If the door lock switch and its wiring are okay, check the oven door lock motor and its wiring by measuring resistance through the motor wires that connect to the control board—the brown and white wires.
The multimeter measures about 2,000 ohms through the door lock motor and its wiring if the motor works as it should.
If so, you’ve now ruled out the door lock switch, the door lock motor and the wiring as causes for the F90 code. By process of elimination, a failed electronic oven control board is causing the F90 code, so replace the control board.
If the meter measures OL or near 0 ohms of resistance through the door lock motor wires, unplug the brown and white wires from the door lock motor and measure the resistance across the motor spades. If the multimeter doesn’t measure about 2,000 ohms on this test, replace the oven door lock assembly because the motor is bad.
If the multimeter measures about 2,000 ohms of resistance through the door lock motor, wiring between the motor and the electronic oven control board is damaged. Check resistance between the ends of the brown wire and the ends of the white wire. The multimeter measures near 0 ohms of resistance through those wire ends if the wires are okay. Repair or replace a wire if the multimeter measure OL.
Also check the resistance between the control board end of the brown wire and the control board end of the white wire. Make sure the opposite ends of those wires don’t touch each other or anything else. The multimeter measures OL if the wires are sound. If it measures 0 ohms or any resistance value other than OL, damaged brown wire insulation and damaged white wire insulation are allowing the internal wire strands of the brown wire to touch internal wire strands of the white wire. Find and repair the wire damage.
After you repair the wiring or replace the failed part, reassemble the range, plug the power cord back in and slide the range back into the cabinet.
The code should disappears and the door will finish locking or unlocking—whichever it was doing when the F90 code occurred. Unlocked the door if it locked and reset the clock.
Well, we hope this video helps you out today. Check out our other videos on the Sears PartsDirect YouTube Channel and subscribe to get notifications when we post new videos.
Was this information helpful?
Most common symptoms to help you fix your ranges
Choose a symptom to see related range repairs.
Main causes: faulty temperature sensor, electronic control board problem, control thermostat failure, weak burner ignite…
Main causes: power supply problem, control thermostat or electronic control board failure, broken element, bad burner ig…
Main causes: food splatters, spilling food on the oven door, allowing liquid to drip through oven door vent when cleanin…
Main causes: power supply failure, blown thermal fuse, bad relay control board, damaged terminal block, wiring failure…
Main causes: broken broiler element, weak or broken broil burner igniter, control system failure, faulty temperature sen…
Main causes: bad bake element, broken burner igniter, control system failure, blown thermal fuse, faulty temperature sen…
Main causes: broken oven door lock assembly, wiring failure, electronic control board problem…
Most common repair guides to help fix your ranges
These step-by-step repair guides will help you safely fix what’s broken on your range.

How to replace a range oven door switch
The oven door switch detects whether the oven door is closed and helps control the oven light. Replace the switch if it …
Repair difficulty
Time required
30 minutes or less

How to replace a range oven door lock assembly
Oven door not locking? You can replace the lock assembly in less than 30 minutes. Here's how.…
Repair difficulty
Time required
15 minutes or less
Effective articles & videos to help repair your ranges
Use the advice and tips in these articles and videos to get the most out of your range.

Beeping oven driving you nuts? Find out what your oven is trying to tell you.…

Learn about all the convenient features on our Sears PartsDirect website that make your parts purchases easier.…

Get answers to frequently asked questions about Sears and Sears PartsDirect.…