How to replace a lawn mower flywheel key on an OHV engine
This step-by-step lawn mower repair guide explains how to replace the flywheel key on a lawn mower with an overhead valve (OHV) engine. The flywheel key is a rectangular metal peg that keeps the crankshaft and flywheel aligned when you tighten the flywheel nut. If the mower blade hits an object with enough force to knock the flywheel out of alignment, the flywheel key breaks, protecting expensive parts such as the crankshaft from damage.
If the flywheel key shears slightly, the engine runs rough or misfires. If the key breaks, the lawn mower stops running and won't start. When you try to start the engine, the starter rope might jerk back. Replace the flywheel key with the manufacturer-approved lawn mower part.
This repair guide and video shows how to replace a sheared flywheel key in common Briggs & Stratton OHV engines that power Craftsman, MTD, Troybilt, Toro, Husqvarna, Poulan, Murray, Weed Eater and Snapper walk-behind lawn mowers.
If your lawn mower is an older model with a flathead engine, see our repair guide How to Replace a Lawn Mower Flywheel Key on a Flathead Engine.
This video explains how to replace the flywheel key on a walk-beind lawn mower with an OHV engine.
Instructions
- 01.
Disconnect the spark plug wire
Disconnect the spark plug wire from the spark plug.
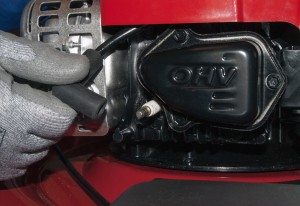
PHOTO: Disconnect the spark plug.
- 02.
Remove the blower housing
Release the starter rope from the mower handle.
Remove the screws from the blower housing.
Pull the blower housing off the engine.
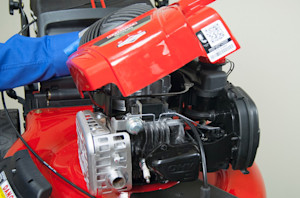
PHOTO: Remove the blower housing.
- 03.
Remove the flywheel mounting nut and recoil starter cup
Push down the bail control bar and clamp it to the mower handle to keep the flywheel brake disengaged.
Tip the mower on its side with the air filter up. Wedge a block of wood between the mower blade and the housing to keep the crankshaft from turning when you loosen the flywheel nut.
Connect a socket wrench to the flywheel nut and tap the socket wrench handle with a hammer to loosen the flywheel nut.
Remove the flywheel nut and washer and pull off the recoil starter cup.
To protect the crankshaft thread, rethread the flywheel nut on the crankshaft so it's flush with the end of the crankshaft.
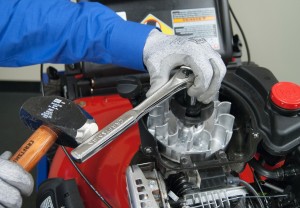
PHOTO: Remove the flywheel nut.
- 04.
Remove the flywheel key
Position the flywheel puller tool above the crankshaft on the flywheel and thread the puller bolts into the pre-drilled holes on the flywheel.
Hand tighten the top nuts on the flywheel puller shafts.
Loosen the lower nuts on the flywheel puller shafts to allow enough clearance to pull the flywheel up.
Alternately, rotate the top flywheel puller nuts clockwise with a wrench to raise the flywheel evenly until the flywheel breaks free from the crankshaft.
If the flywheel doesn't break loose on its own, tap the top of the flywheel with a mallet to break it free.
After freeing the flywheel, loosen the top nuts on the flywheel puller shafts. Unthread the flywheel puller shafts from the top of the flywheel and remove the flywheel puller tool.
Remove the flywheel nut and pull the flywheel off the crankshaft.
Remove the remnants of the flywheel key from the crankshaft.
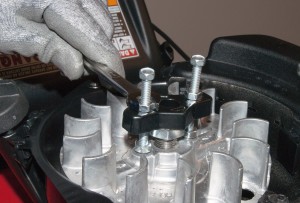
PHOTO: Remove the flywheel from the crankshaft.
- 05.
Install the new flywheel key
Push the flywheel onto the crankshaft and line up the notch in the flywheel with the slot in the crankshaft.
Push the new flywheel key into the crankshaft slot and tap it down flush with the top of the flywheel.
Reinstall the recoil starter cup and flywheel washer on the crankshaft.
Thread the flywheel nut onto the crankshaft and hand tighten the flywheel nut.
Reposition the block of wood against the cutting blade under the mower deck so the crankshaft doesn’t turn when you tighten the flywheel nut.
Use a torque wrench to tighten the flywheel nut to 55 ft-lbs.
Remove the wood block from the cutting blade.
Remove the clamp from the bail control bar.
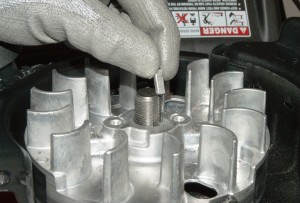
PHOTO: Install the new flywheel key into the crankshaft slot.
- 06.
Reinstall the blower housing
Position the blower housing on the top of the engine and line up the mounting holes.
Reinstall the blower housing mounting screws.
Reconnect the starter rope to the mower handle.
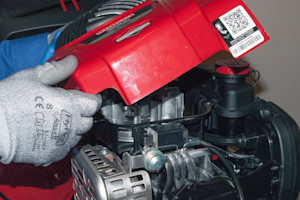
PHOTO: Reinstall the blower housing.
- 07.
Reconnect the spark plug wire
Connect the spark plug wire to the spark plug.

Symptoms for gas walk-behind mowers
Choose a symptom to see related walk-behind mower repairs.
Main causes: damaged cutting blade, loose cutting blade, damaged flywheel key, engine needs tune up…
Main causes: uneven wheel height settings, damaged wheel, dull or damaged cutting blade…
Main causes: engine needs tune up, dirty or clogged carburetor, damaged flywheel key…
Main causes: drive control cable failure, worn or broken drive belt, bad transmission, broken drive wheel…
Main causes: stale gas, engine needs tune up, bad spark plug, dead battery, bad recoil starter, faulty safety switch, ba…
Main causes: dirty carburetor, bad spark plug, clogged air filter, engine choke problems, clogged gas cap vent…
Repair guides for gas walk-behind mowers
These step-by-step repair guides will help you safely fix what’s broken on your walk-behind lawn mower.

How to rebuild a lawn mower carburetor
The carburetor mixes air with fuel to drive the piston. Rebuild the carburetor if it's clogged or leaks.…

How to replace a lawn mower recoil starter on an OHV engine
Replace the recoil starter if it doesn't move when you pull the starter rope.…

How to replace a lawn mower wheel
Learn how replace a damaged wheel on a walk-behind lawn mower—it's a quick, easy fix.…
Effective articles & videos to help repair your walk-behind mowers
Use the advice and tips in these articles and videos to get the most out of your walk-behind lawn mower.

Learn about all the convenient features on our Sears PartsDirect website that make your parts purchases easier.…

Get answers to frequently asked questions about Sears and Sears PartsDirect.…

Learn about the different kinds of mower blades and how to maintain them.…