- Kenmore refrigerator water filters
- Whirlpool refrigerator water filters
- Samsung refrigerator water filters
- GE refrigerator water filters
- LG refrigerator water filters
- Frigidaire refrigerator water filters
- KitchenAid refrigerator water filters
- Maytag refrigerator water filters
- Kenmore Elite refrigerator water filters
- Estate refrigerator water filters
- GE Profile refrigerator water filters
- Amana refrigerator water filters
- Bosch refrigerator water filters
- Dacor refrigerator water filters
- Electrolux refrigerator water filters
How to replace a diffuser in a side-by-side refrigerator
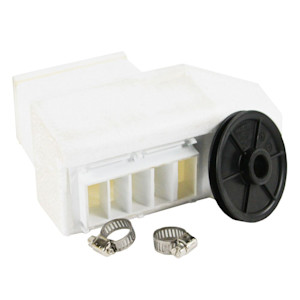
This DIY repair guide gives step-by-step instructions on how to replace the diffuser in a side-by-side refrigerator. The diffuser, also called an air damper, controls cold air flow from the freezer compartment to the refrigerator compartment. If the diffuser is stuck fully open, food in the refrigerator compartment freezers. If it's stuck closed, the refrigerator becomes too warm but the freezer stays cold. If the diffuser doesn't control the cold air flow correctly, replace it with the manufacturer-approved side-by-side refrigerator part that fits your model.
This basic repair procedure works for many Kenmore, Whirlpool, KitchenAid, GE, Maytag, Amana, Frigidaire, Electrolux and LG side-by-side refrigerators.
Quick links
Instructions
Tools required
1/4-inch nut driver
Slot screwdriver
Phillips screwdriver
Work gloves
Tape
Repair difficulty
Time required
60 minutes or less
Repair difficulty
Time required
60 minutes or less
Instructions
- 01.
Shut off power and water to the refrigerator
Unplug the refrigerator or shut off the circuit breaker for the refrigerator.
Close the water supply cut-off valve for the water line attached to the back of the refrigerator. The valve is often on the wall behind the refrigerator but could be under the kitchen sink or in the basement below the refrigerator.
Tip: Move highly perishable food to a cooler or other cooled space. The refrigerator will be without power for about 60 minutes, which shouldn't affect most refrigerated or frozen foods. - 02.
Remove the ice maker
Use tape to shut the flipper cover on the left wall in front of the ice maker.
Open the plastic cover in front of the refrigerator ice maker.
Slide the cover to the left and push up on the right side of the cover to release the plastic pin from the bracket.
Use a slot screwdriver to pry the pin from the bracket, if necessary.
Pull off the cover and set it aside.
Tape the flipper shut.
Using a 1/4-inch nut driver, remove the screw that's under the ice maker module, in the rear right corner. Pull off the cover the screw held in place and set the screw and cover aside.
Push in on the tab to the left of the ice maker to release the ice maker and slide the ice maker forward, off its rails.
Use a slot screwdriver to release the locking tab on the wire harness plug and pull the wire harness out of the plug.
Remove the ice maker from the freezer compartment.
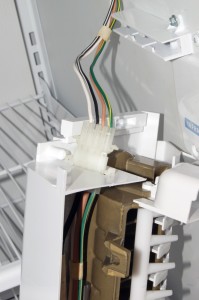
PHOTO: Remove the ice maker from its rails.
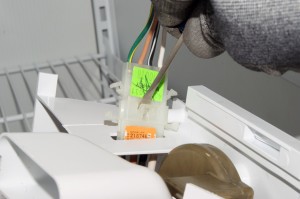
PHOTO: Release the wire harness locking tab.
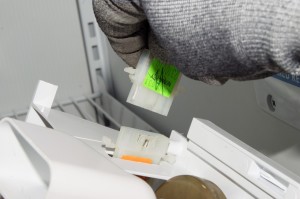
PHOTO: Unplug the wire harness.
- 03.
Remove the air duct
Remove the screws from the air duct in the top of the freezer compartment—support the air duct as you remove the second screw so it doesn't fall.
Remove the air duct from the freezer compartment and set it aside.
Tip: Removing the air duct give you access to locking tabs on the freezer side of the diffuser that you'll release in a later step. - 04.
Remove the diffuser
In the refrigerator compartment, remove the 2 mounting screws that hold the control housing in place—support the housing as you remove the second screw so the control housing doesn't fall and damage components.
Lower the control housing slowly.
Using a slot screwdriver, release the locking tabs and then unplug the wire harness.
Because the connecting rod for the diffuser is still connected, so you may be unable to pull the control assembly completely out of the refrigerator.
Disconnect the wire harness.
Release the locking tabs on the freezer side of the diffuser.
Push the diffuser toward the refrigerator compartment slightly to keep the tabs from snapping back into place.
In the refrigerator compartment, pull the control housing and diffuser out and down to completely release those components.
Work the control rod out of the diffuser. You might have to rotate the diffuser 90 degrees to release the control rod.
Remove the diffuser.
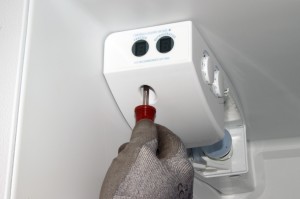
PHOTO: Remove the front control housing screw.
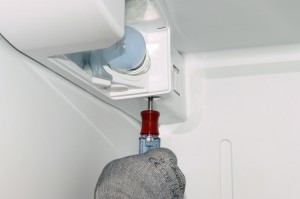
PHOTO: Remove the rear control housing screw.
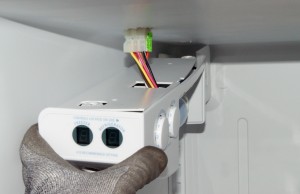
PHOTO: Pull down the control housing.
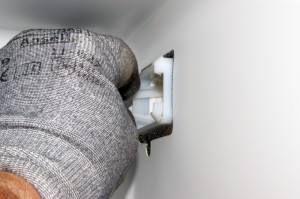
PHOTO: Release the freezer side diffuser locking tabs.

PHOTO: Remove the control housing and diffuser.
- 05.
Install the new diffuser
Connect the control rod to the new diffuser.
Position the diffuser and the control housing in the opening in the top of the refrigerator compartment and push the diffuser into the opening until the locking tabs snap into place.
Push the wire harness for the control housing into the wire harness plug in the refrigerator compartment.
Position the control housing and line up the screw holes.
Insert the mounting screws and tighten them firmly to secure the control housing in the top of the refrigerator compartment.
Tip: Tighten the mounting screws firmly, but don't overtighten them. - 06.
Reinstall the air duct
Position the air duct in the freezer compartment.
Line up the screw holes and replace the mounting screws.
Again, tighten the mounting screws firmly, but don’t overtighten them.
- 07.
Reinstall the ice maker
Hold the ice maker near the mounting rails and plug in the wire harness into the connection plug until the locking tab snaps into place.
Line up the new ice maker with the mounting rails and push it onto the rails until you can position the fill tube in the fill cup.
Put the fill tube into the cup.
Slide the ice maker module into position until the locking tab snaps into place.
Position the plastic wire harness cover and screw it into place.
Tighten the Screws firmly, but don't overtighten.
Position the front plastic cover in front of the mounting clip and insert the left side pin into the mounting clip.
Work the right side pin over the top of the mounting clip and snap it into place. Remove the tape that holds the flipper cover.
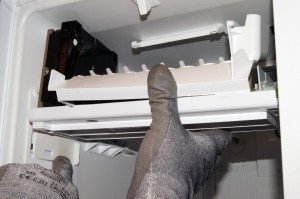
PHOTO: Slide the ice maker onto its rails.
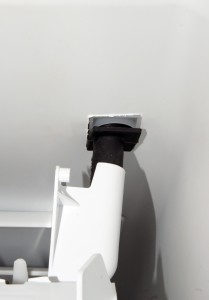
PHOTO: Position the fill tube inside the fill cup.
- 08.
Restore water and electricity
Open the water supply shut-off valve to restore the water supply to the refrigerator. Plug in the refrigerator or turn on the house circuit breaker to restore power.
Warning: Undertaking repairs to appliances can be hazardous. Use the proper tools and safety equipment noted in the guide and follow all instructions. Don’t proceed until you’re confident that you understand all the steps and are capable of completing the repair. Some repairs should only be performed by a qualified technician.
Most common symptoms to help you fix your refrigerators
Choose a symptom to see related refrigerator repairs.
Main causes: blocked vents, defrost system problems, evaporator fan failure, dirty condenser coils, bad sensors, condens…
Main causes: damaged door seal, faulty defrost sensor or bi-metal thermostat, broken defrost heater, bad defrost timer o…
Main causes: jammed ice cubes, broken ice maker assembly, dirty water filter, kinked water line, bad water valve, freeze…
Main causes: control board or cold control failure, broken compressor start relay, compressor motor failure, defrost tim…
Main causes: leaky door gasket, defrost system failure, evaporator fan not running, dirty condenser coils, condenser fan…
Main causes: blocked air vents, compressor problems, condenser or evaporator fan not working, control system failure, se…
Main causes: water valve leaking, frozen or broken defrost drain tube, overflowing drain pan, cracked water system tubin…
Things to do: clean condenser coils, replace the water filter, clean the interior, adjust doors to prevent air leaks, cl…
Most common repair guides to help fix your refrigerators
These step-by-step repair guides will help you safely fix what’s broken on your refrigerator.
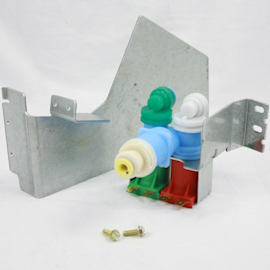
How to replace a refrigerator water valve
Replace the water valve that feeds water to the ice maker and water dispenser if it no longer controls the flow of water…
Repair difficulty
Time required
15 minutes or less

How to clean refrigerator condenser coils
Help your refrigerator run more efficiently by cleaning the condenser coils. It's easy and takes just a few minutes.…
Repair difficulty
Time required
15 minutes or less
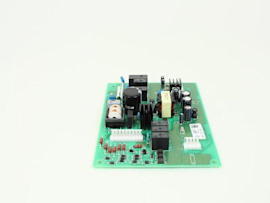
How to replace a refrigerator temperature control board
If the temperature in your refrigerator doesn't match the temperature you set, the problem could be the temperature cont…
Repair difficulty
Time required
30 minutes or less
Effective articles & videos to help repair your refrigerators
Use the advice and tips in these articles and videos to get the most out of your refrigerator.
No matter what style Maytag refrigerator you have, we can walk you through replacing the water filter.…

Learn about all the convenient features on our Sears PartsDirect website that make your parts purchases easier.…
If your refrigerator's ice maker isn't producing as much ice as it should, or water is flowing poorly from the dispenser…
