- Kenmore refrigerator water filters
- Whirlpool refrigerator water filters
- Samsung refrigerator water filters
- GE refrigerator water filters
- LG refrigerator water filters
- Frigidaire refrigerator water filters
- KitchenAid refrigerator water filters
- Maytag refrigerator water filters
- Kenmore Elite refrigerator water filters
- Estate refrigerator water filters
- GE Profile refrigerator water filters
- Amana refrigerator water filters
- Bosch refrigerator water filters
- Dacor refrigerator water filters
- Electrolux refrigerator water filters
How to replace a dishwasher timer
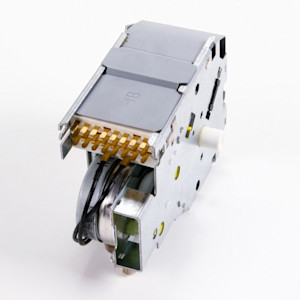
This DIY repair guide explains how to replace a dishwasher timer. The timer is behind the cycle control knob in the control panel. A small electric motor inside the timer advances the control knob and rotates cams inside the timer. The cams turn on and off the electro-mechanical components in the dishwasher such as the wash pump, drain pump, water inlet valve and heating element. Replace the timer with the manufacturer-approved dishwasher part if it won’t advance or if the cams fail to properly turn on and off components in the dishwasher.
This guide shows the GE and Kenmore dishwasher timer replacement procedure. You also can use the same basic process to replace the timer in Whirlpool, KitchenAid, Frigidaire, Electrolux, Maytag and Amana dishwashers.
To find the dishwasher timer replacement part you need, search for your model number to find a complete list of the repair parts for your dishwasher.
Quick links
Instructions
Tools required
Phillips screwdriver
Torx screwdriver
Work gloves
Repair difficulty
Time required
15 minutes or less
Repair difficulty
Time required
15 minutes or less
Instructions
- 01.
Shut off electrical power
Flip the house circuit breaker switch to the Off position to completely disconnect electrical power to the dishwasher (instead of a breaker, some older homes have a fuse that you remove from the fuse box). To verify that power is disconnected, make sure the display on the control panel can't be activated.
- 02.
Remove the timer knob
Pull the timer knob straight off of the front of the control panel.
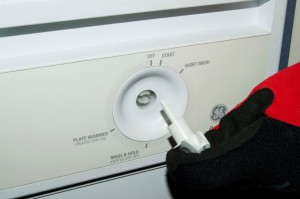
PHOTO: Pull off the timer knob.
- 03.
Remove the door latch handle knob
Remove the Phillips screw located under the latch handle knob. Slide the handle knob off the end of the handle.
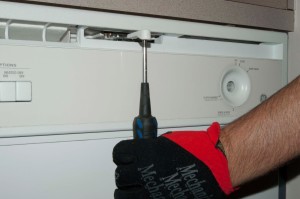
PHOTO: Remove the dishwasher door latch handle knob.
- 04.
Separate the outer door panel from the inner door panel
Open the door and remove every screw on the inner door panel.
Shut the entire dishwasher door and latch it.
Grasp the sides of the outer door panel and pull the outer door panel down to separate the door panels and access the timer that is attached to the outer door panel. The inner door panel will remain closed.
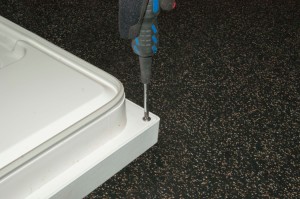
PHOTO: Remove the inner door panel screws.

PHOTO: Separate the dishwasher door panels.
- 05.
Remove the timer
Disconnect the wire harness connector from the timer.
Remove the timer mounting screws and remove the timer.

PHOTO: Unplug the wire harness.
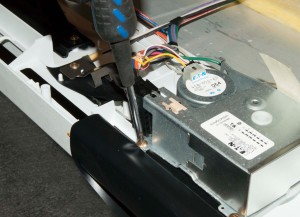
PHOTO: Remove the mounting screws.
- 06.
Attach wires to the new timer
Attach the wires to the new timer the same way they were connected to the original timer.
Reinstall the timer mounting screws.
- 07.
Reattach the outer door panel to the inner door panel
Close the outer door so that it mates up with the inner door panel.
Grasp the inner and outer door panels and open the door. Keep the inner door panel postioned against the outer door panel.
Line up the mounting screw holes and reinstall the screws that hold the inner door panel and outer door panel together.
Tip: The mounting screws that fit in the bottom corners of the door are machine threaded screws. These machine threaded screws must go back into the bottom corners of the inner door panel to properly secure the inner door panel to the door frame. - 08.
Reinstall the door latch handle knob.
Slide the latch handle knob back onto the door latch handle and reinstall the screw.
- 09.
Restore electrical power
Flip the house circuit breaker switch to the On position. The dishwasher display should light up after you restore electricity. Test that the dishwasher control buttons work.
Warning: Undertaking repairs to appliances can be hazardous. Use the proper tools and safety equipment noted in the guide and follow all instructions. Do not proceed until you are confident that you understand all of the steps and are capable of completing the repair. Some repairs should only be performed by a qualified technician.


Most common symptoms to help you fix your dishwashers
Choose a symptom to see related dishwasher repairs.
Main causes: water supply problem, stuck overfill float, clogged water inlet valve screen, water inlet valve failure…
Main causes: clogged kitchen sink drain, clogged drain hose, drain check valve damaged, drain pump failure, control syst…
Main causes: broken door spring, damaged or broken door hinge…
Main cause: damaged rack height adjuster…
Main causes: improper loading, low water temperature, improper detergent dosage, detergent dispenser failure, spray arm …
Main causes: light switch beside the sink turned off, lack of power, bad dishwasher door switch, control system failure,…
Main causes: not using rinse aid, rinse aid dispenser failure, broken heating element, malfunctioning vent, drying fan f…
Main causes: broken door latch, tripped circuit breaker, broken heating element, faulty vent fan, sensor failure, contro…
Main causes: glass or popcorn kernel stuck in the chopper blade, drain line vibrating against the cabinet, debris in was…
Most common repair guides to help fix your dishwashers
These step-by-step repair guides will help you safely fix what’s broken on your dishwasher.

How to replace a dishwasher heating element
Dishes not drying as fast as they should? The dishwasher heating element could be on the fritz. Here's how to install a …
Repair difficulty
Time required
45 minutes or less

How to replace a dishwasher high-limit thermostat
Follow these steps to replace the high-limit thermostat in your dishwasher if prevents the heating element from heating.…
Repair difficulty
Time required
30 minutes or less

How to replace a dishwasher diverter motor
Upper spray arms not getting water? The diverter motor could be broken. Use this guide to replace it.…
Repair difficulty
Time required
30 minutes or less
Effective articles & videos to help repair your dishwashers
Use the advice and tips in these articles and videos to get the most out of your dishwasher.

Get tips on completing essential holiday cleaning tasks to brighten your home.…

Learn about all the convenient features on our Sears PartsDirect website that make your parts purchases easier.…

Get answers to frequently asked questions about Sears and Sears PartsDirect.…