CONFIRM THE PART FITS
Part Information
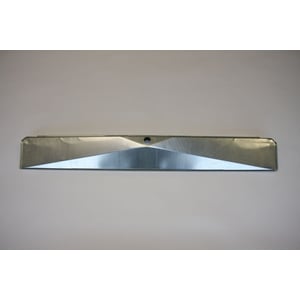
This evaporator drip pan (part number WR17X2243) is for refrigerators.
Evaporator drip pan WR17X2243 attaches under the evaporator coils and catches water melting off the coils during the defrost cycle.
Safely store any food that could deteriorate while the power is off and unplug the refrigerator before installing this part. Wear work gloves to protect your hands.
Frequently Used Together
- $64.22
- $54.99
- $6.67 |13% OFF Phone Price : $7.67
- $14.09
- $180.85 |6% OFF Phone Price : $192.85
- $14.40 |12% OFF Phone Price : $16.40
- $10.99 |15% OFF Phone Price : $12.99
- $24.54
- $49.98
- $49.98
Top models using the same part
| Model Name | Model Number | Diagram Name |
|---|---|---|
| Model #TBG21DAXHRWW GE top-mount refrigerator | TBG21DAXHRWW | Compartment separator parts |
| Model #TBT21DAXTRWW GE top-mount refrigerator | TBT21DAXTRWW | Compartment separator parts |
| Model #TBG21DAXKRWW GE top-mount refrigerator | TBG21DAXKRWW | Compartment separator parts |
| Model #TBG21DAYBRWW GE top-mount refrigerator | TBG21DAYBRWW | Compartment separator |
| Model #TBK21JAXERWW GE top-mount refrigerator | TBK21JAXERWW | Comparment separator/divider block |
| Model #TBK21JAXERAA GE top-mount refrigerator | TBK21JAXERAA | Comparment separator/divider block |
| Model #TBT21JAXTRAA GE top-mount refrigerator | TBT21JAXTRAA | Compartment separator parts |
| Model #TBT21DAXTRAA GE top-mount refrigerator | TBT21DAXTRAA | Compartment separator parts |
| Model #CTG21GABPRWW Hotpoint top-mount refrigerator | CTG21GABPRWW | Compartment separator |
| Model #CTT21GABNRWW Hotpoint top-mount refrigerator | CTT21GABNRWW | Compartment separator |
Reviews
GE Refrigerator Evaporator Drip Pan install
Symptom was water draining along the back wall of the inside of the refrigerator due to drip pan corrosion. Water would collect in the bottom of refrigerator and sometimes spill out onto the floor. Item was not difficult to install, unplug machine, remove food, ice maker, shelf and back panel. Carefully remove screws holding the evaporator coil in place, gently move to the side. Remove 2 screws holding drip pan in place, then carefully remove it. I ended up carefully removing the existing gasket and re-using on the new part. Put new part in place, re-assemble in reverse order and the job was done. Take care not to damage the evaporator or defrost heater, include lines and wires. Take care to place everything back the same way you removed. Might be helpul to take a photo before moving things out of the way. Took about one hour.
DavidE, Mullica Hill, NJ
Did you find this review helpful?
- Ease of Installation
- Moderate
- Duration of Installation
- 1 - 2 hours
Yes, I would recommend this to a friend
a1 all of the way and a great price.
made well worked as it should. shipped fast after i call, invoice was showing it could be 4 weeks. got it in 3 days.
leggs46, Undisclosed
Did you find this review helpful?
- Ease of Installation
- Difficult
- Duration of Installation
- 1 - 2 hours
