- Kenmore refrigerator water filters
- Whirlpool refrigerator water filters
- Samsung refrigerator water filters
- GE refrigerator water filters
- LG refrigerator water filters
- Frigidaire refrigerator water filters
- KitchenAid refrigerator water filters
- Maytag refrigerator water filters
- Kenmore Elite refrigerator water filters
- Estate refrigerator water filters
- GE Profile refrigerator water filters
- Amana refrigerator water filters
- Bosch refrigerator water filters
- Dacor refrigerator water filters
- Electrolux refrigerator water filters
CONFIRM THE PART FITS
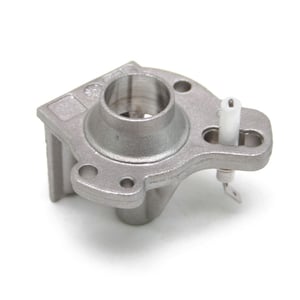
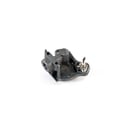
Range Surface Burner Orifice Holder WP7527P021-60
Part #WP7527P021-60
Online Only Price
$53.71 |
10% OFF Phone Price : $59.71
In Stock
For ZIP codes near Edit
This part fits
Previous part numbers
Part #WP74007390
Part #7527P021-60
Part #74007962
Part #74007390
Part Information
This surface burner orifice holder (part number WP7527P021-60) is for ranges.
Surface burner orifice holder WP7527P021-60 supports the orifice that regulates gas flow to the burner.
Unplug the range and shut off the gas supply before installing this part. Wear work gloves to protect your hands.
Frequently Used Together
- $53.07 |10% OFF Phone Price : $59.07
- $102.91 |10% OFF Phone Price : $114.91
- $50.89 |11% OFF Phone Price : $56.89
- $47.15 |11% OFF Phone Price : $53.15
- $79.49 |7% OFF Phone Price : $85.49
Top models using the same part
| Model Name | Model Number | Diagram Name |
|---|---|---|
| Model #JDR8895BCB13 Jenn-Air range | JDR8895BCB13 | Manifold parts |
| Model #JDR8895BCS13 Jenn-Air range | JDR8895BCS13 | Manifold parts |
| Model #JDR8895BCW13 Jenn-Air range | JDR8895BCW13 | Manifold parts |
| Model #66578009800 Kenmore Elite gas range | 66578009800 | Manifold parts |
| Model #66578003801 Kenmore Elite gas range | 66578003801 | Manifold parts |
| Model #66578003800 Kenmore Elite gas range | 66578003800 | Manifold parts |
| Model #66578002801 Kenmore Elite gas range | 66578002801 | Manifold parts |
| Model #66578009801 Kenmore Elite gas range | 66578009801 | Manifold parts |
| Model #66578002800 Kenmore Elite gas range | 66578002800 | Manifold parts |
| Model #MGR6751BDW19 Maytag gas range | MGR6751BDW19 | Manifold parts |
Reviews
Installation is Complete
This replacement part (Orfice holder) worked as expected and was easy to install.
SWCSeabee, Torrance, CA
Did you find this review helpful?
- Ease of Installation
- Easy
- Duration of Installation
- 30 minutes - 1 hour
Yes, I would recommend this to a friend
Installation Proceedure
Replacing the Surface Burner Orifice Holder & Igniter Part No: WP7527P021-60 (This part will fit all Burners). REPLACEMENT PROCEEDURE Remove Oven and Broiler Doors - Remove Burner Grates and Burner Caps Ð Pull Range out from wall. Unplug Range and turn-off the gas supply valve (Don't disconnect the gas supply line). Remove the Back Cover Ð Disconnect the gas supply line (_ aluminum tube) where it connects to the Range-Top Manifold. Remove Burner Head: Remove (2) screws on the Burner Head (one on each side). If screws are corroded and cannot be removed, use a _ drill bit to remove the screw heads. Remove (2) screws (one LH Ð one RH) located under the front flange of the Range Top Cover. Pull the Range Top Cover slightly forward and swing it up about 9Ó. Place a 1Ó x 2Óx 9Ó long wood block under the front of the Range Top Cover to hold it up. Remove the Igniter wire from the Igniter. Disconnect the Burner Head gas supply line from the associated Burner Valve. Remove the Surface Burner Orifice Holder & Igniter from the Range Top Cover then disconnect the Burner Head gas supply line from the Surface Burner Orifice Holder & Igniter. PREPARE THE NEW SURFACE BURNER ORIFICE HOLDER & IGNITER: Using a #8 x _Ó long Stainless Steel Phillips Head Screw, use the screw to tap the two holes that attach the Surface Burner Orifice Holder & Igniter to the Burner Head/Range Top Cover- Position the Igniter so it aligns with the opening in the Burner Head. INSTALL THE NEW SURFACE BURNER ORIFICE HOLDER & IGNITER: Attach the Burner Head gas supply line to the Surface Burner Orifice Holder & Igniter. Use (2) new #8 x _Ó long Stainless Steel Phillips Head Screws to LOOSLEY attach the Surface Burner Orifice Holder & Igniter/gas supply line to the Burner Head/Range Top Cover. (DO NOT TIGHTEN YET). Attach the Burner Head gas supply line to the associated Burner Valve. Attach the Igniter wire to the new Igniter. Tighten the (2) #8 x _Ó long Stainless Steel Phillips Head Screws on the new Burner Head. Lower the Range Top Cover Ð install the (2) screws on the front, underside of the Range Top Cover. Re-connect the gas supply line to the Range Top Manifold. Re-install the back cover Ð plug-in power supply Ð test new igniter Ð turn-on gas supply valve Ð test burner. Push Range back to the wall Ð install front doors. DONE
Egbert, Greenville, SC
Did you find this review helpful?
- Ease of Installation
- Moderate
- Duration of Installation
- 30 minutes - 1 hour
Yes, I would recommend this to a friend
