CONFIRM THE PART FITS
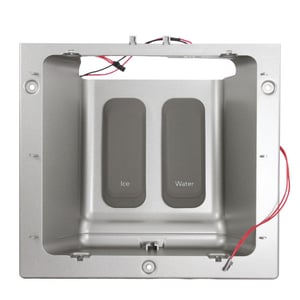
Refrigerator Dispenser Cover Assembly WPW10260622
Part #WPW10260622
Part Information
This dispenser cover assembly (part number WPW10260622) is for refrigerators.
Dispenser cover WPW10260622 covers the front of the water dispenser on the refrigerator door. The assembly includes the dispenser cover and the dispenser buttons.
Safely store any food that could deteriorate while the power is off and unplug the refrigerator before replacing this part. Wear work gloves to protect your hands.
Frequently Used Together
- $80.90 |7% OFF Phone Price : $86.90
- $69.66 |8% OFF Phone Price : $75.66
- $296.36 |$12.00 OFF Phone Price : $308.36
- $43.54 |12% OFF Phone Price : $49.54
- $180.65 |6% OFF Phone Price : $192.65
- $15.16 |12% OFF Phone Price : $17.16
- $141.61 |8% OFF Was : $153.92
- $191.44 |6% OFF Phone Price : $203.44
Top models using the same part
| Model Name | Model Number | Diagram Name |
|---|---|---|
| Model #KSSC48QVS03 KitchenAid side-by-side refrigerator | KSSC48QVS03 | Dispenser front parts |
| Model #KSSC48QVS05 KitchenAid side-by-side refrigerator | KSSC48QVS05 | Dispenser parts |
| Model #KSSC48QVS02 KitchenAid side-by-side refrigerator | KSSC48QVS02 | Dispenser front parts |
| Model #KSSC48QVS01 KitchenAid side-by-side refrigerator | KSSC48QVS01 | Dispenser front parts |
| Model #KSSS42QTB02 KitchenAid side-by-side refrigerator | KSSS42QTB02 | Dispenser parts |
| Model #KSSO42QTB00 KitchenAid side-by-side refrigerator | KSSO42QTB00 | Dispenser front parts |
| Model #KSSS42QTB03 KitchenAid side-by-side refrigerator | KSSS42QTB03 | Dispenser front parts |
| Model #KSSC42QTS03 KitchenAid side-by-side refrigerator | KSSC42QTS03 | Dispenser front parts |
| Model #KSSC42QVS02 KitchenAid side-by-side refrigerator | KSSC42QVS02 | Dispenser front parts |
| Model #KSSS42QTB00 KitchenAid side-by-side refrigerator | KSSS42QTB00 | Dispenser front parts |
Reviews
Original quality
To install the cover assembly turn off the power, remove the door's metal sheet skin with many screws around the door edges and 4 screws at the top and bottom of the dispenser cover since they are also holding the skin. Then the skin together with handle comes off. Then unscrew the controller, unplug the cables and unscrew the dispenser cover. In my case the new cover came with plastic tabs at the top that the old one did not have. Since they are helpful in supporting the controller, I left them alone and had to make couple of notches in the paper separator that was taped there. After that, installed everything in reverse order but check the operation before putting the skin back on.
Kajtek0, CA
Did you find this review helpful?
- Ease of Installation
- Moderate
- Duration of Installation
- 30 minutes - 1 hour
Yes, I would recommend this to a friend
