
Dryer Push-to-Start Switch (replaces WE04M0416,...
$22.89
| 21% OFF Phone Price : $28.89
Dryer Push-to-Start Switch (replaces WE04M0416,...
This Sears PartsDirect video shows how to interpret common symbols in a wiring schematic, also called a wiring diagram. A schematic is a "map" of the wiring and current flow through the various components of an appliance. Understanding the symbols and layout of a wiring schematic will help you test each component so that you can buy the right part to fix the problem.
This video is the first in a series of three videos bout schematics.
The second video shows where to find the wiring diagram on your appliance and how to decipher the lines and symbols.
The third video explains how to trace a circuit on a wiring diagram.
When you troubleshoot an electrical problem in an appliance, a multimeter is an essential tool. How to use a multimeter to test electrical parts video shows you how.
Once you’ve figured out which part needs replacing, look for step-by-step instructions for the appliance in our DIY repair help section.
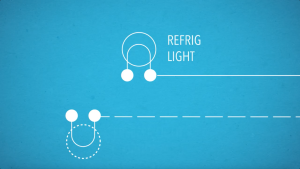
Reading a schematic can feel overwhelming—like a foreign language. But once you learn the basics, you’ll understand how schematics work. Let’s take a look at some of the most common symbols you’ll find in a refrigerator schematic and what they mean. The lines are wires. They connect the symbols, which represent components of the appliance. Following the lines will help you determine, the cause of a failure and buy the right part to fix the problem. Many appliances have at least one light. Here’s what that symbol looks like. You’ll often see a switch that controls the light.
So let’s say your refrigerator light doesn’t work, even after you changed the bulb. The wiring schematic helps you figure out which part to replace: the light socket or the switch.
If your refrigerator is too warm, but the freezer section is cold, you’ll want to look for this symbol: the defrost heater. It’s connected to a thermostat. That symbol looks like this. It’s also connected to a timer. Look for this symbol. You may need to check the evaporator fan motor. Motors look like this. If your refrigerator isn’t cooling at all, you’ll likely want to hunt down this symbol for the cold control adjustable thermostat.
If the ice maker doesn’t fill with water, you may need to check the water valve. Understanding the symbols and layout of a wiring schematic will help you test each component so that you can buy the right part to fix the problem. For more DIY help, head to SearsPartsDirect.com.

Choose a symptom to see related ice maker repairs.
Main causes: failing compressor, bad condenser fan motor, faulty drain pump, bad recirculation pump, water supply proble...
Main causes: dirty evaporator plate, untreated water supply, food items being stored in ice storage bin...
Main causes: wiring failure, broken cutting grid, faulty electronic control board...
Main causes: bad electronic control board, water supply problems, faulty recirculation pump, sealed system failure, brok...
Main causes: cracked water supply line, leaky drain line, broken drain pump, cracked water reservoir, leaky ice bin...
Main causes: bad bin thermistor, condenser fan failure, faulty control board...
Main causes: water supply problems, control board failure, weak recirculation pump, clogged water distributer, faulty cu...
Main causes: lack of electrical power, bad power cord, wiring failure, bad control board, faulty bin thermistor, bad eva...
These step-by-step repair guides will help you safely fix what’s broken on your ice maker.

If your ice maker isn’t making ice, the pump could be the problem. Here’s how to replace it. ...

When the electronic control board won’t activate the ice maker components, follow these steps to install a new one....

When the cutting grid is broken, ice cubes don’t drop into the ice bin. Use the steps in this repair guide to replace a...
Use the advice and tips in these articles and videos to get the most out of your ice maker.

Learn about all the convenient features on our Sears PartsDirect website that make your parts purchases easier....

Get answers to frequently asked questions about Sears and Sears PartsDirect....

See what troubleshooting steps to take with your freestanding ice maker before calling for repair....