- Kenmore refrigerator water filters
- Whirlpool refrigerator water filters
- Samsung refrigerator water filters
- GE refrigerator water filters
- LG refrigerator water filters
- Frigidaire refrigerator water filters
- KitchenAid refrigerator water filters
- Maytag refrigerator water filters
- Kenmore Elite refrigerator water filters
- Estate refrigerator water filters
- GE Profile refrigerator water filters
- Amana refrigerator water filters
- Bosch refrigerator water filters
- Dacor refrigerator water filters
- Electrolux refrigerator water filters
How to install a thermal cut-off fuse kit in an electric dryer
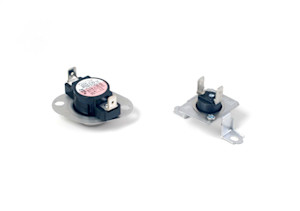
This dryer repair guide explains how to replace the thermal cut-off fuse in an electric dryer. The thermal cut-off fuse is a safety device that shuts down the dryer's heating element if the dryer severely overheats. The dryer severely overheats if the high-limit thermostat didn't shut off the dryer when the heating element began overheating. You can't reset the thermal cut-off fuse—you must replace it, as well as the failed high-limit thermostat. The thermal cut-off fuse kit contains both components, and the step-by-step instructions in this repair guide show you how to replace them in an electric dryer, using a manufacturer-approved replacement kit.
Use this procedure to install a thermal cut-off fuse kit in Kenmore, Whirlpool, Maytag, Amana, Roper, Crosley and Estate electric dryers with a lint screen housing located in the top dryer panel.
If you have a gas dryer, see the repair guide How to Install a Thermal Cut-off Fuse Kit in a Gas Dryer.
Quick links
Video
Instructions
Tools required
1/4-inch nut driver
slot screwdriver
Vacuum cleaner or shop vac
Work gloves
Repair difficulty
Time required
15 minutes or less
Repair difficulty
Time required
15 minutes or less
Installing a thermal cut-off fuse kit on an electric dryer
This video explains how to install a thermal cut-off fuse kit in an electric dryer.
Instructions
- 01.
Shut off the power
Unplug the dryer to disconnect electrical power.
- 0-2.
Remove the back panel
Move the dryer forward and use a 1/4-inch nut driver to remove the screws from the back panel. Remove the back panel from the dryer and set it aside.
Tip: While you have the back of the dryer open, vacuum lint and dust from inside the dryer.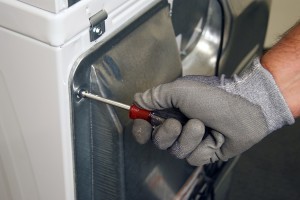
PHOTO: Remove the back panel screws.
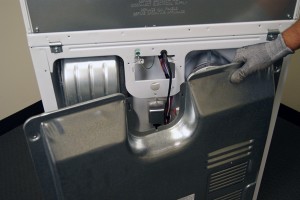
PHOTO: Remove the back panel from the dryer.
- 03.
Locate the components
The thermal cut-off fuse is at the top of the heater box.
The high-limit thermostat is at the bottom of the heater box above the connections for the heating element.
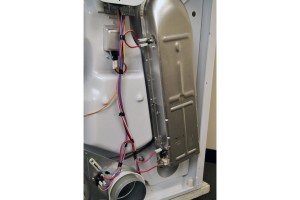
PHOTO: Locate the high-limit thermostat and the thermal cut-off fuse.
- 04.
Remove the thermal cut-off fuse
Remove the wires from the thermal cut-off fuse.
Remove the mounting screws from the thermal cut-off fuse and pull it off of the heater box.
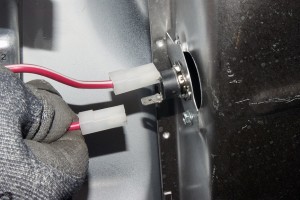
PHOTO: Disconnect the wires from the thermal cut-off fuse.

PHOTO: Remove the mounting screws from the thermal cut-off fuse.
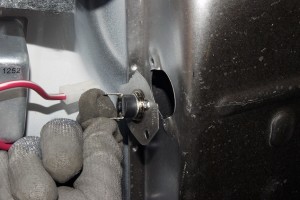
PHOTO: Remove the fuse from the heater box.
- 05.
Install the new thermal cut-off fuse
Position the new thermal cut-off fuse in place and mount it to the heater box. Connect the wires to the new thermal cut-off fuse.
- 06.
Remove the high-limit thermostat
Pull the wire off of the high-limit thermostat. Remove the high-limit thermostat from the side of the heater box.
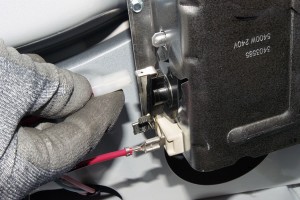
PHOTO: Disconnect the wire from the high-limit thermostat.

PHOTO: Remove the high-limit thermostat from the heater box.
- 07.
Install the new the high-limit thermostat
Position the new high-limit thermostat in place and mount it to the heater box. Connect the wires to the new high-limit thermostat.
- 08.
Reattach the back panel
Position the back panel on the back of the dryer. Line up the mounting screw holes. Insert the mounting screws and tighten them firmly.
- 09.
Plug in the dryer
Plug the dryer into the wall outlet to restore electrical power.
Warning: Undertaking repairs to appliances can be hazardous. Use the proper tools and safety equipment noted in the guide and follow all instructions. Do not proceed until you are confident that you understand all of the steps and are capable of completing the repair. Some repairs should only be performed by a qualified technician.


Most common symptoms to help you fix your dryers
Choose a symptom to see related dryer repairs.
Main causes: bad gas valve coils, broken heating element, tripped safety thermostat or fuse, bad operating thermostat, c…
Main causes: clogged exhaust system, heating system failure, deposits on moisture sensor, control system failure…
Main causes: bad drum support roller, damaged idler pulley, broken blower fan blade, worn drum glide bearing, bad drive …
Main causes: door switch failure, lack of power, broken belt, blown thermal fuse, bad drive motor, control system failur…
Main causes: damaged door strike, worn door catch…
Main causes: clogged exhaust vent, bad motor relay, loose dryer door catch, bad door switch, control system failure, fau…
Main causes: bad timer or electronic control board, door switch failure…
Main causes: lack of electrical power, bad power cord, wiring failure, bad control board, blown thermal fuse, bad door s…
Most common repair guides to help fix your dryers
These step-by-step repair guides will help you safely fix what’s broken on your dryer.

How to replace a dryer thermistor
The thermistor senses the air temperature in the dryer. If your dryer overheats or doesn't heat at all, the thermistor …
Repair difficulty
Time required
30 minutes or less

How to install a thermal cut-off fuse kit in a gas dryer
The thermal cut-off fuse shuts off the heat if the dryer overheats when the high-limit thermostat fails. The thermal cut…
Repair difficulty
Time required
15 minutes or less

How to replace a dryer drive belt
If the drive belt breaks, the motor runs but the drum won't rotate. These step-by-step instructions guide you through th…
Repair difficulty
Time required
90 minutes or less
Effective articles & videos to help repair your dryers
Use the advice and tips in these articles and videos to get the most out of your dryer.

Get expert tips on using your dryer efficiently to save energy.…

Learn about all the convenient features on our Sears PartsDirect website that make your parts purchases easier.…

Get answers to frequently asked questions about Sears and Sears PartsDirect.…