April 01, 2013

How to replace a lawn mower ignition coil on a flathead engine

How to replace a lawn mower ignition coil on a flathead engine

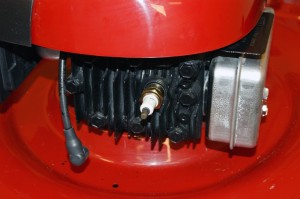
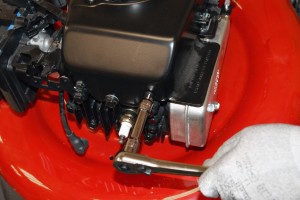
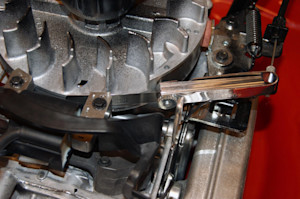
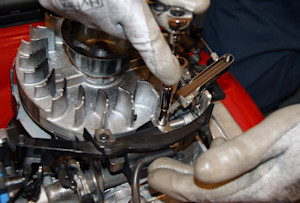
This DIY lawn mower repair guide shows how to replace the ignition coil on a lawn mower that has a flathead engine. The ignition coil sends the electric current to the spark plug to ignite the fuel in the cylinder. If the ignition coil doesn't send electric current to the spark plug when you pull the starter rope, replace the coil with the manufacturer-approved lawn mower part.

Use this repair procedure to replace the ignition coil on common Briggs & Stratton flathead engines that power Craftsman, Husqvarna, MTD, Murray, Snapper, Toro, Troybilt, Cub Cadet and Ariens walk-behind lawn mowers.

If your lawn mower is a newer model with an overhead valve (OHV) engine, see our repair guide How to Replace a Lawn Mower Ignition Coil on an OHV Engine.

Quick links
Tools required
Phillips screwdriver
Socket wrench set
Feeler gauge
Work gloves
Repair difficulty
Time required
30 minutes or less
Repair difficulty
Time required
30 minutes or less

Instructions

  1. 01.

    Disconnect the spark plug wire

    Wear work gloves to protect your hands.

    Disconnect the spark wire so there's no chance that the mower could accidentally start.

    PHOTO: Disconnect the lawn mower spark plug wire.

    PHOTO: Disconnect the lawn mower spark plug wire.

  2. 02.

    Remove the starter rope from the guide

    Remove the starter rope from the rope guide. If the rope won't slip past the guide and the handle, loosen the guide.

    PHOTO: Remove the starter rope.

    PHOTO: Remove the starter rope.

  3. 03.

    Remove the engine cover

    Remove the screws securing the engine cover to the engine. Slide the rope through the hole in the engine cover. 

    PHOTO: Remove the engine cover.

    PHOTO: Remove the engine cover.

  4. 04.

    Remove the fuel tank

    Remove the screws that secure the fuel tank to the engine. Lift the tank off, being careful to keep the fuel tank upright so it doesn't not leak.

    PHOTO: Remove the fuel tank.

    PHOTO: Remove the fuel tank.

  5. 05.

    Remove the dipstick

    Remove the screw that secures the dipstick tube to the housing. Remove the dipstick from the engine and plug the hole with a paper towel to keep debris from falling into the engine. 

    PHOTO: Remove the dipstick tube.

    PHOTO: Remove the dipstick tube.

  6. 06.

    Remove the engine blower housing

    Remove the bolts securing the blower housing to the engine and remove the housing from the engine. 

    PHOTO: Remove the blower housing.

    PHOTO: Remove the blower housing.

  7. 07.

    Remove the ignition coil

    Turn the flywheel so the magnet is pointing away from the ignition coil.

    Remove the screws from the ignition coil.

    Lift the ignition coil up and disconnect the kill wire. 

    PHOTO: Remove the screws from the coil.

    PHOTO: Remove the screws from the coil.

    PHOTO: Lift the ignition coil up.

    PHOTO: Lift the ignition coil up.

    PHOTO: Remove the kill wire.

    PHOTO: Remove the kill wire.

  8. 08.

    Install the new ignition coil

    Connect the kill wire to the new ignition coil.

    Place the new ignition coil onto the engine. Install the two bolts leaving them loose. Pull the coil away from the engine.

  9. 09.

    Set the air gap

    While holding the feeler gauge in between the coil and flywheel, allow the magnet to pull the coil against the feeler gauge. Tighten the mounting screws.  

    Tip: The correct gap for most engines is 0.010-inch.
    PHOTO: Insert the feeler gauge.

    PHOTO: Insert the feeler gauge.

    PHOTO: Tighten the coil mounting screws.

    PHOTO: Tighten the coil mounting screws.

  10. 10.

    Reassemble the mower

    Position the engine blower housing on the engine and bolt it into place.

    Remove the paper towel from the dipstick opening, slide the dipstick into the engine and secure it with the screw.

    Feed the starter rope handle through the engine cover up to the rope guide.

    Reinstall the fuel tank.

    Position the engine cover on the engine and screw it into place. 

  11. 11.

    Reconnect the spark plug wire

    Attach the spark plug wire and make sure the mower works properly. 

Warning: Undertaking repairs to appliances can be hazardous. Use the proper tools and safety equipment noted in the guide and follow all instructions. Do not proceed until you are confident that you understand all of the steps and are capable of completing the repair. Some repairs should only be performed by a qualified technician.

Symptoms for gas walk-behind mowers

Choose a symptom to see related walk-behind mower repairs.

Main causes: damaged cutting blade, loose cutting blade, damaged flywheel key, engine needs tune up…

Main causes: uneven wheel height settings, damaged wheel, dull or damaged cutting blade…

Main causes: engine needs tune up, dirty or clogged carburetor, damaged flywheel key…

Main causes: drive control cable failure, worn or broken drive belt, bad transmission, broken drive wheel…

Main causes: stale gas, engine needs tune up, bad spark plug, dead battery, bad recoil starter, faulty safety switch, ba…

Main causes: dirty carburetor, bad spark plug, clogged air filter, engine choke problems, clogged gas cap vent…

Repair guides for gas walk-behind mowers

These step-by-step repair guides will help you safely fix what’s broken on your walk-behind lawn mower.

How to rebuild a lawn mower carburetor

How to rebuild a lawn mower carburetor

The carburetor mixes air with fuel to drive the piston. Rebuild the carburetor if it's clogged or leaks.…

Repair difficulty
Time required
 60 minutes or less
How to replace a lawn mower recoil starter on an OHV engine

How to replace a lawn mower recoil starter on an OHV engine

Replace the recoil starter if it doesn't move when you pull the starter rope.…

Repair difficulty
Time required
 15 minutes or less
How to replace a lawn mower wheel

How to replace a lawn mower wheel

Learn how replace a damaged wheel on a walk-behind lawn mower—it's a quick, easy fix.…

Repair difficulty
Time required
 15 minutes or less

Effective articles & videos to help repair your walk-behind mowers

Use the advice and tips in these articles and videos to get the most out of your walk-behind lawn mower.

How to enjoy all the online benefits we offer on our Sears PartsDirect website

How to enjoy all the online benefits we offer on our Sears PartsDirect website

Learn about all the convenient features on our Sears PartsDirect website that make your parts purchases easier.…

Top questions about Sears and Sears PartsDirect

Top questions about Sears and Sears PartsDirect

Get answers to frequently asked questions about Sears and Sears PartsDirect.…

Types of walk-behind mower blades video

Types of walk-behind mower blades video

Learn about the different kinds of mower blades and how to maintain them.…