
$344.05 |
$12.00 OFF Phone Price : $356.05
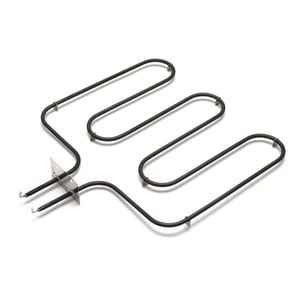
This Frigidaire bake element part number 318254902 effectively replaces the prior part number 318254908. It is crucial for maintaining the oven's baking performance, providing consistent and even heat distribution. Prior to installation, ensure the range is unplugged or the circuit breaker is turned off to prevent electrical shock.
Typical installation involves: 1. Safely removing the old bake element. 2. Carefully connecting the new bake element to the existing terminals without damaging any connections. 3. Checking connections for firmness to prevent electrical faults.
For optimal performance and safety, the installation should be conducted following the manufacturer?s guidelines. Always wear work gloves to prevent hand injury during the installation process. If unsure about the fitting process, consulting a professional technician is advisable.
This part significantly resolves issues related to uneven baking and loss of oven heat, ensuring your appliance operates at peak efficiency.
| Model Name | Model Number | Diagram Name |
|---|---|---|
| Model #79048762901 Kenmore electric wall oven | 79048762901 | Lower oven |
| Model #79047903602 Kenmore Elite electric wall oven | 79047903602 | Lower oven |
| Model #79047882601 Kenmore Elite electric wall oven | 79047882601 | Body |
| Model #79047909600 Kenmore Elite electric wall oven | 79047909600 | Upper oven |
| Model #79047903603 Kenmore Elite electric wall oven | 79047903603 | Upper oven |
| Model #79048173002 Kenmore Elite electric wall oven | 79048173002 | Lower oven |
| Model #79047889600 Kenmore Elite electric wall oven | 79047889600 | Body |
| Model #79047903601 Kenmore Elite electric wall oven | 79047903601 | Upper oven |
| Model #79047883601 Kenmore Elite electric wall oven | 79047883601 | Body |
| Model #79047882600 Kenmore Elite electric wall oven | 79047882600 | Body |
Took less than 15 minutes to replace the top oven element from start to finish. And that includes an extra few minutes to break loose the screws that had become very tight over nearly 10 tears of use. Online video was helpful if you're unsure how to proceed. Part fit & works perfectly, we're VERY pleased with this experience!
B-Wood99, Brentwood, TN
Did you find this review helpful?
Yes, I would recommend this to a friend
Spec'd and ordered online..all went well with the install
Latch, Houston
Did you find this review helpful?
Yes, I would recommend this to a friend
IT WAS EASY TO INSTALL I DID IT WITHOUT INSTRUCTION
S L J, BRENTWOOD TN
Did you find this review helpful?
Yes, I would recommend this to a friend
This item was easier to install than expected. It is useful to have the original product manual before you begin. TURN OFF THE POWER TO THE OVEN BEFORE YOU START. Before you begin, get a good trouble light or similar auxiliary light source in position, because when you disconnect the power to the oven, you will be working in the dark to make your connections. Removing the plate in the back of the oven covering the element electrical connectors is the only tricky part. You need a special No. 2 SQUARE screwdriver head. A Phillips head, Torxx, or a flat blade screwdriver will not work. Once the plate is removed, you will see a hole packed full of insulation. That material will resist your pulling out the old heating element to reveal the electrical connectors. Use a tool such as a screwdriver to gently tease away the insulation around the electrical wire connectors. It's best not to pull out the insulation! After making your new electrical connections, you need to force the new element back into position, and the insulation will resist this. Again, use your screwdriver to gently push the insulation out of the way just enough to position the new element. Replace the 2 square head screws and you're done!
Denny, Chisholm, MN
Did you find this review helpful?
Yes, I would recommend this to a friend
I remove the bad element about a week before the replacement element can so it only took about 5 minutes to install
Don w, Baton Rouge la
Did you find this review helpful?
Yes, I would recommend this to a friend
2 screws to move , pull out & unplug , reinstall . The screws were hard to remove because of the heat , use a vise grip to start then you can use a phillips screw driver to remove.
Wayne, Rialto Calif.
Did you find this review helpful?
Yes, I would recommend this to a friend
Expensive part but was unsure if any generics would work in its place.
George D, Bayonne, NJ
Did you find this review helpful?
Yes, I would recommend this to a friend
Very easy to replace. Ten minutes. The part fit exactly. You do need the right tool to remove the part.
Stan s, South Windsor CT
Did you find this review helpful?
Yes, I would recommend this to a friend


