- Kenmore refrigerator water filters
- Whirlpool refrigerator water filters
- Samsung refrigerator water filters
- GE refrigerator water filters
- LG refrigerator water filters
- Frigidaire refrigerator water filters
- KitchenAid refrigerator water filters
- Maytag refrigerator water filters
- Kenmore Elite refrigerator water filters
- Estate refrigerator water filters
- GE Profile refrigerator water filters
- Amana refrigerator water filters
- Bosch refrigerator water filters
- Dacor refrigerator water filters
- Electrolux refrigerator water filters
How to replace a water softener timer
This DIY repair guide explains how to replace the timer in a water softener. The timer controls the water softening and regeneration cycles, and lets you program the settings of the water softener. If there's power to the water softener but the display is blank, or if the control panel won't work when you touch a button, replace the timer with the manufacturer-approved water softener part.
Use this procedure to replace the timer in Kenmore, GE and Whirlpool water softeners.
Quick links
Video
Instructions
Tools required
Work gloves
Repair difficulty
Time required
15 minutes or less
Repair difficulty
Time required
15 minutes or less
How to replace a water softener timer repair guide video.
Replacing a water softener timer video.
Instructions
- 01.
Disconnect electrical power
Unplug the water softener to disconnect power.
- 02.
Remove the top cover
Open the lid and release the 2 front clips on the cover.
Lift the front of the cover up and push it back to release the rear tabs.
Pull the top cover off.
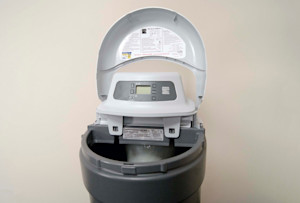
PHOTO: Open the lid.
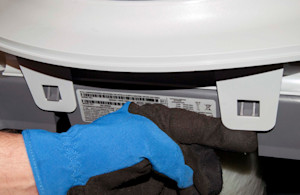
PHOTO: Release the front clips.

PHOTO: Remove the top cover.
- 03.
Remove control panel
Release the locking tabs on the sides of the control panel and pull the control panel off.
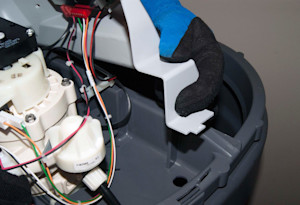
PHOTO: Release the control panel locking tabs.
- 04.
Remove the salt storage tank light
Pull the light for the salt storage tank up and out of the top of the tank.
Tip: The salt storage tank light is hardwired to the timer and cannot be disconnected.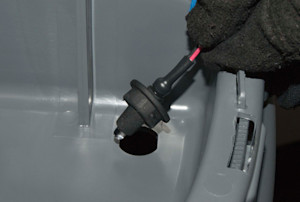
PHOTO: Pull the salt tank light out.
- 05.
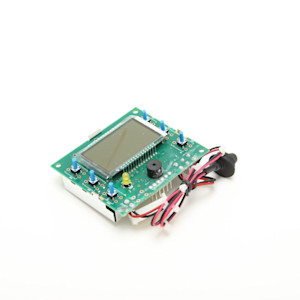
Remove the timer
Pull the 2 black wires off of the timer.
Unplug the wire harness from the timer.
Disconnect the valve motor wire harness.
Release the locking tabs at the corners of the timer and pull the timer out of the control panel.

PHOTO: Disconnect the timer wire harness.
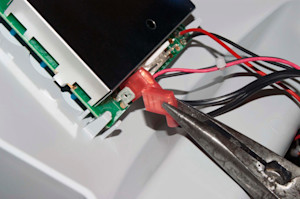
PHOTO: Disconnect the black wires.
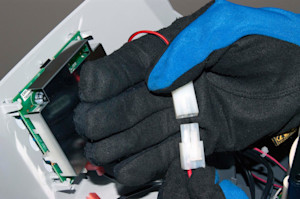
PHOTO: Unplug the motor wire harness.
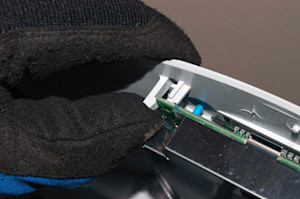
PHOTO: Release the timer locking clips.
- 06.
Install the new timer
A new salt storage tank light is attached to the new timer.
Push the new salt storage tank light into the opening at the top of the salt tank.
Position the new timer in the control panel and snap the timer into the control panel locking tabs.
Connect the wires to the new timer.
Plug in the valve motor wire harness.

PHOTO: Install the tank light.
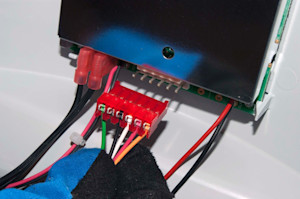
PHOTO: Connect the timer wires.

PHOTO: Connect the motor wire harness.
- 07.
Reinstall the control panel
Position the control panel on the top of the tank and engage the locking tabs.
- 08.
Reinstall the top cover
Position the back of the top cover into the rear tabs and then push the front of the top cover down into the front locking clips.
Close the lid.

PHOTO: Reinstall the top cover.
- 09.
Restore power
Plug the power cord back in.
- 10.
Program the new timer
Program the new timer according to the instructions in your owner’s manual.
Warning: Undertaking repairs to appliances can be hazardous. Use the proper tools and safety equipment noted in the guide and follow all instructions. Do not proceed until you are confident that you understand all of the steps and are capable of completing the repair. Some repairs should only be performed by a qualified technician.


Symptoms for water softeners
Choose a symptom to see related water softener repairs.
Main causes: clogged drain hose, faulty rotor valve, leaky rotor valve seals…
Main causes: broken water flow meter, faulty timer, water flow to softener is bypassed…
Main causes: faulty brine valve assembly, bad rotor valve…
Main causes: broken resin tank screen, bad resin tank seals, cracked upper distributor in resin tank…
Main causes: salt bridge inside the salt tank, bad timer, valve motor failure, faulty rotor valve, clogged venturi…
Main causes: lack of electrical power, bad power transformer, faulty timer…
Main causes: empty salt tank, salt bridge, depleted resin, clogged or damaged venturi, broken rotor position switch, fai…
Main causes: loose water line connections, cracked water-carrying components, bad rotor valve seals…
Repair guides for water softeners
These step-by-step repair guides will help you safely fix what’s broken on your water softener.

How to replace a water softener venturi
The venturi valve in your water softener draws brine water from the salt tank to the resin tank for regeneration. Follow…
Repair difficulty
Time required
15 minutes or less

How to replace a water softener rotor position switch
The rotor position switch detects the position of the valve rotor. If the rotor position switch fails, follow these step…
Repair difficulty
Time required
30 minutes or less

How to replace a water softener timer
The timer is the control board you use to program the water softener. If the timer isn’t accepting commands when you pus…
Repair difficulty
Time required
15 minutes or less
Articles and videos for water softeners
Use the advice and tips in these articles and videos to get the most out of your water softener.

Learn about all the convenient features on our Sears PartsDirect website that make your parts purchases easier.…

Get answers to frequently asked questions about Sears and Sears PartsDirect.…

Learn how to use a multimeter to check for wiring problems in an appliance that's not working…